How to Set Up and Manage an eSIM on iPhone
Learn the essentials of setting up and managing an eSIM on your iPhone with easy-to-follow steps and practical tips for a seamless experience.

Have you ever found yourself scratching your head, wondering how to set up an eSIM on your iPhone? Well, you're not alone.
A recent survey by GSMA Intelligence revealed that more than 70% of the people were not familiar with eSIM technology or its benefits.
But don't worry, we've got your back! As digital nomads who use eSIMs daily on our iPhones when traveling, we packed this guide with our firsthand experience and hard-won knowledge to help you master eSIM setup and management.
We'll walk you through everything – from understanding what an eSIM is to checking if your iPhone supports eSIMs, and finally, how to activate and manage your eSIM plan seamlessly.
So, let's dive right in and make the most of this useful feature on your iPhone!
What is an eSIM and How Does it Work on iPhone?
An eSIM is a virtual SIM that allows you to activate mobile data plans digitally, just like you would download an app. No more fumbling with tiny physical SIM cards or struggling to insert them into that tiny slot!
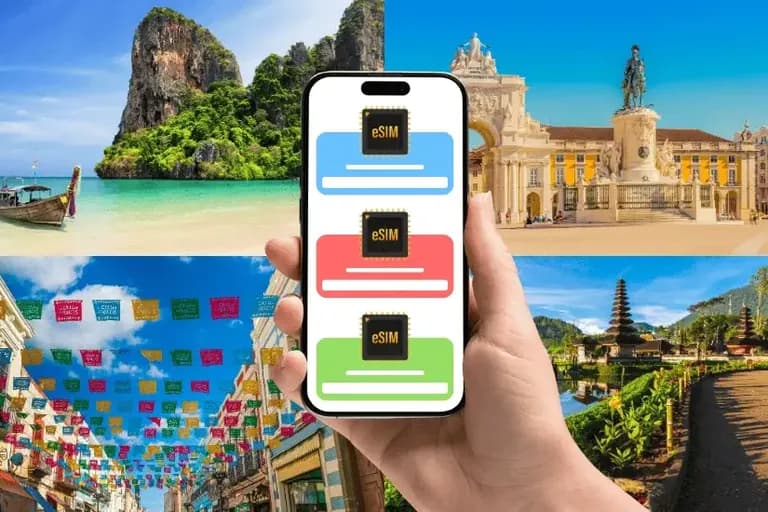
The best part? You can store 8 or more eSIMs on your iPhone and use 2 phone numbers at once. This is really handy if you need a separate number for work or are traveling between countries.
Are All iPhone Models Compatible with eSIM?
Not all iPhones are created equal, especially when it comes to eSIM compatibility.
Apple first introduced eSIM support starting with the iPhone XS, XS Max and XR. This means if you have one of these models or newer iPhones, your device can use an eSIM.
You may still be wondering: how can I be sure my iPhone supports eSIMs? Here are a few easy ways to find out:
- Check for the "EID" Code: In the "Settings" app, navigate to "General," then "About." If you find an "EID" code, your iPhone supports eSIMs.
- Look for the "Add eSIM" Option: Under "Settings," choose "Mobile Data." An "Add eSIM" option means your iPhone is eSIM-compatible.
- Inspect Digital SIM Section: In the same "About" screen, look for a "eSIM" section. If your iPhone has a built-in eSIM, you'll see details here, like an IMEI number.
Now that we're clear on what an eSIM is, how it works on iPhone, and how to find out if your iPhone is eSIM compatible, let's see how you can activate your eSIM on iPhone.
As there are many eSIM providers out there, we will use GigSky as an example, as they are renowned for their pioneering role of becoming iPhone's first eSIM partner.
How Can I Activate an eSIM on iPhone?
Once you've bought your eSIM from an online eSIM provider like GigSky, you can install the eSIMs on your iPhone using mainly three methods:
Method 1: QR Code Scanning
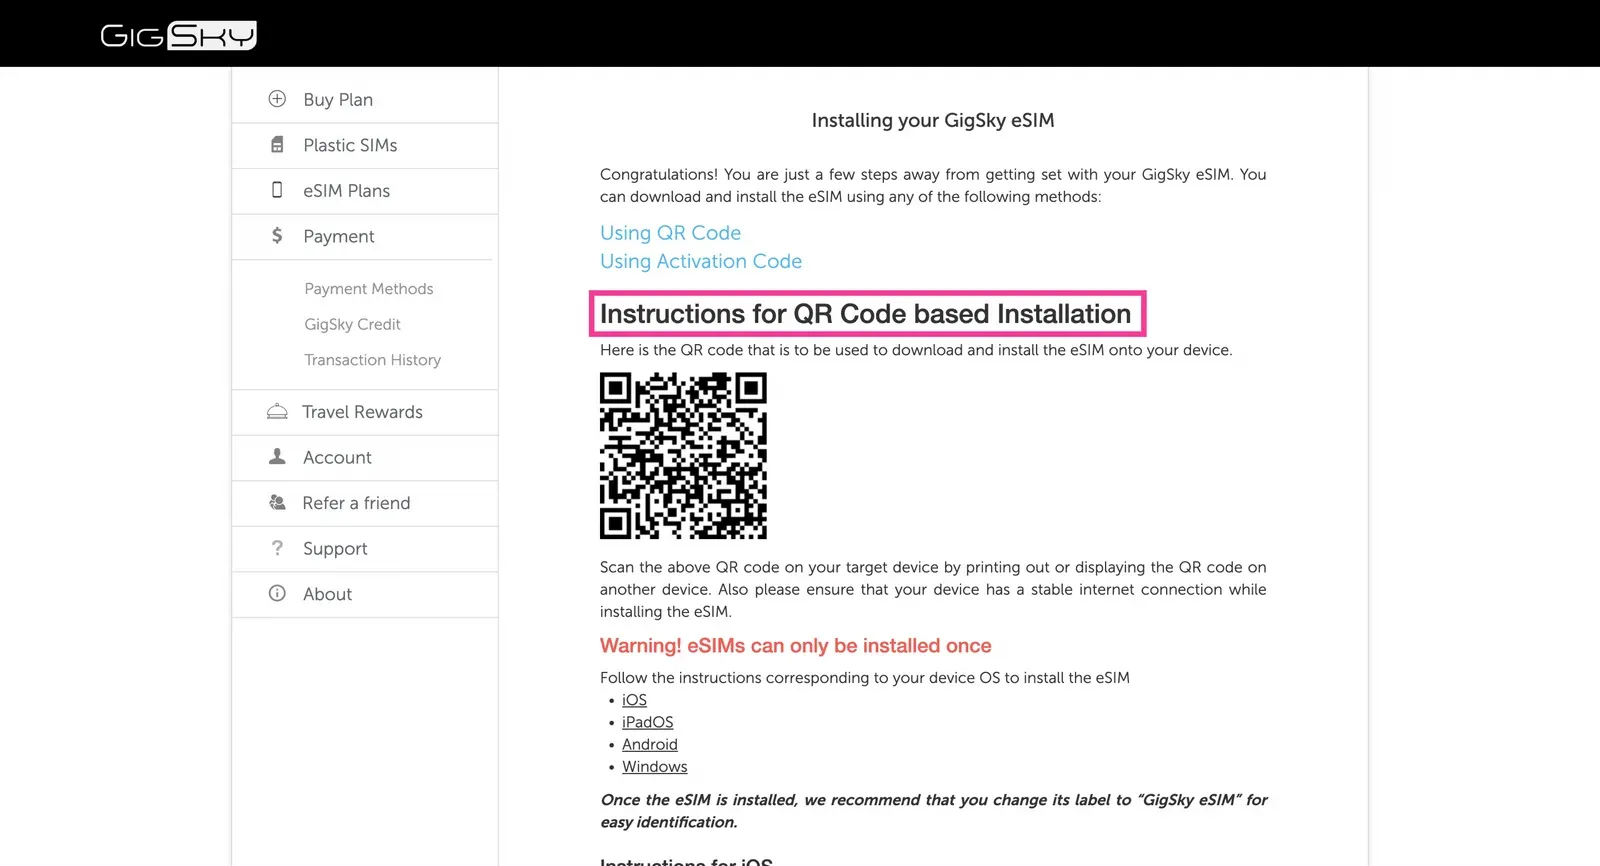
If you opt for a QR code installation, these are the steps:
- Receive a QR code from your provider, usually via email or directly on their app
- Open the Camera app on your iPhone
- Scan the QR code to start the eSIM activation process
Method 2: Manual Installation
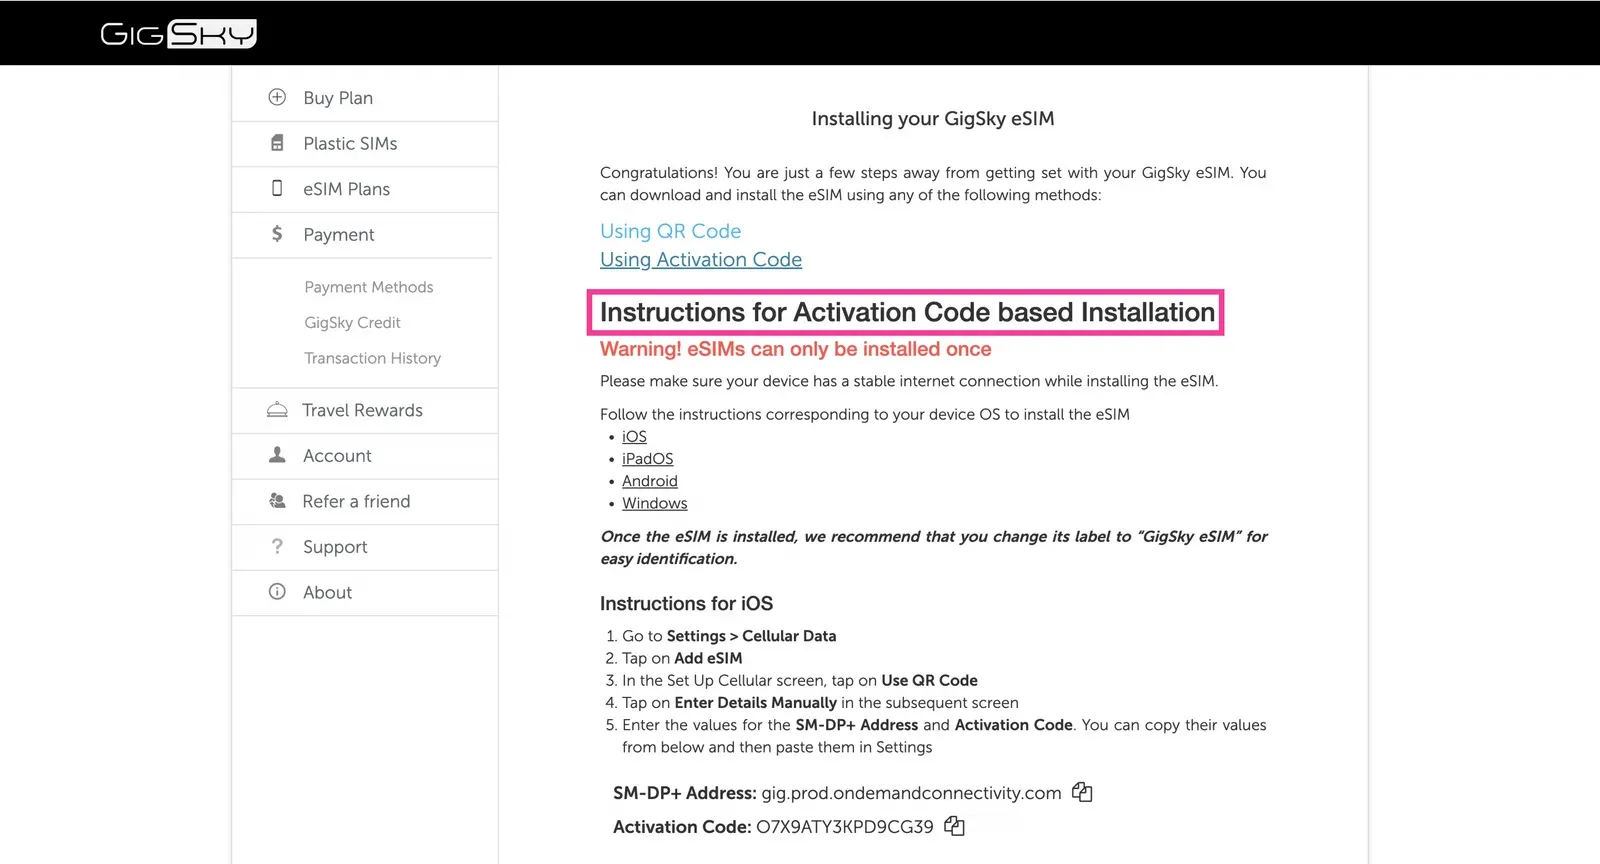
This is a bit of a techy option to install eSIMs but nothing too difficult. Below are the exact steps to manually activate your eSIM on iPhone:
- Receive manual installation instructions from your provider, typically via email or their app
- Open your iPhone's "Settings" and then go to "Mobile Data"
- Scroll down to the list of SIMs and tap on "Add eSIM"
- Tap on "Use QR Code" and, instead of using your iPhone camera, tap on "Enter Details Manually" at the bottom of the screen
- Enter the "SM-DP+ Address" and "Activation Code" provided by the eSIM provider (leave the "Confirmation Code" empty).
Method 3: Automatic Activation (Our Personal Favourite)
This is the easiest and fastest option, although not all the providers offer it. But if they do, these are the exact steps to automatically activate your eSIM on your iPhone:
- Go on your provider's app and select the option for "Automatic installation" (or similar)
- Simply follow the easy app’s instructions to activate your eSIM
Travel Smart with GigSky eSIMs and Save 15%!
Use the Code 'Freaking15' to get 15% Off on all GigSky eSIMs for land and inflight data!
Claim Your Discount Before It’s Gone!While setting up an eSIM is usually pretty straightforward, we always follow these quick tips to make sure our eSIM activation goes smoothly every time:
- Check your iPhone is compatible with eSIM and has the latest iOS version.
- Connect to a strong Wi-Fi network during the activation process.
- If replacing a physical SIM, remove it after activating eSIM and restart your device.
- If facing issues, contact your provider's customer support for assistance.
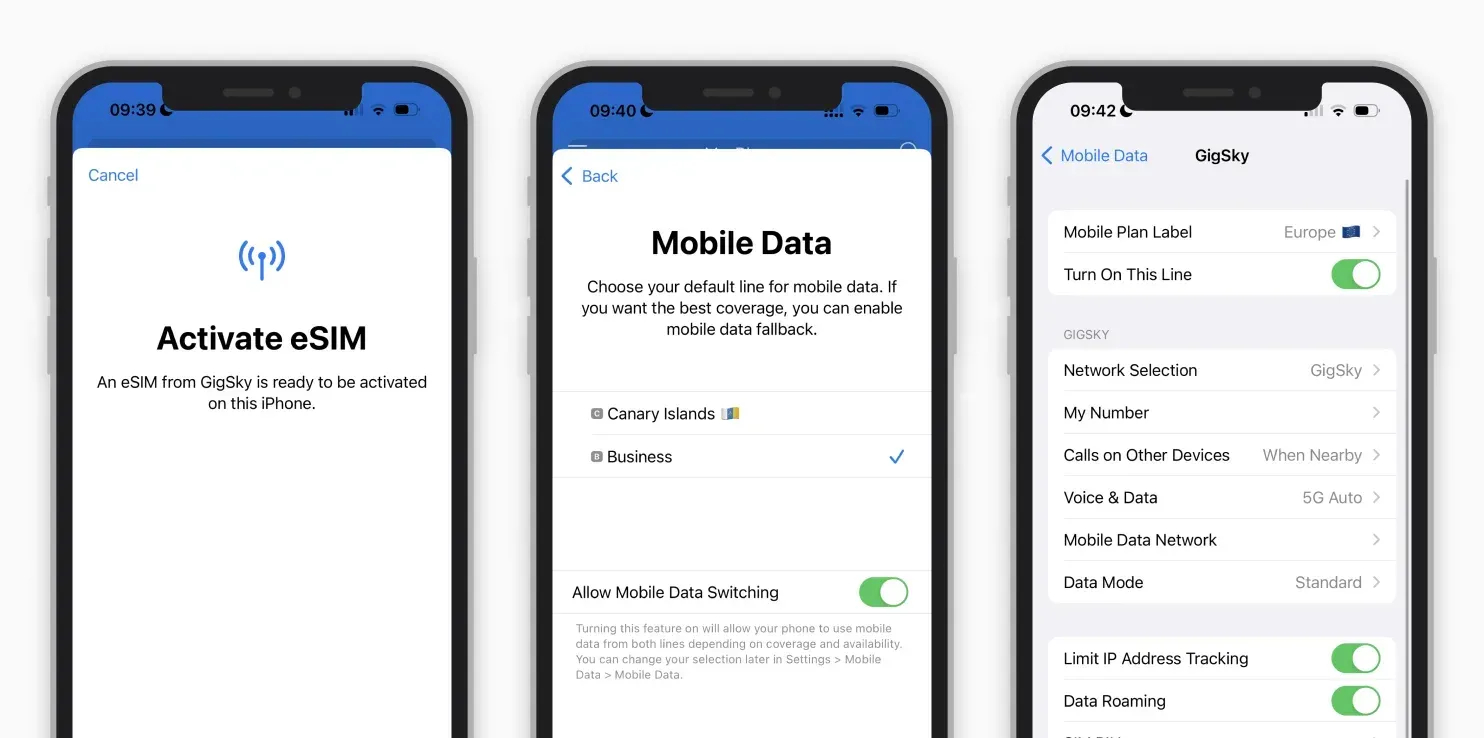
Managing Your eSIM on iPhone
Great job getting that eSIM activated on your iPhone! Now, you probably want to know - where do I find my eSIM to manage it on my iPhone?
No worries, we can walk you through the basics. With plenty of firsthand experience using eSIMs on our own nomadic travels, we have some handy tips to share.
How To Check if an eSIM is Activated on an iPhone
If you want to see if your eSIM is up and running, simply:
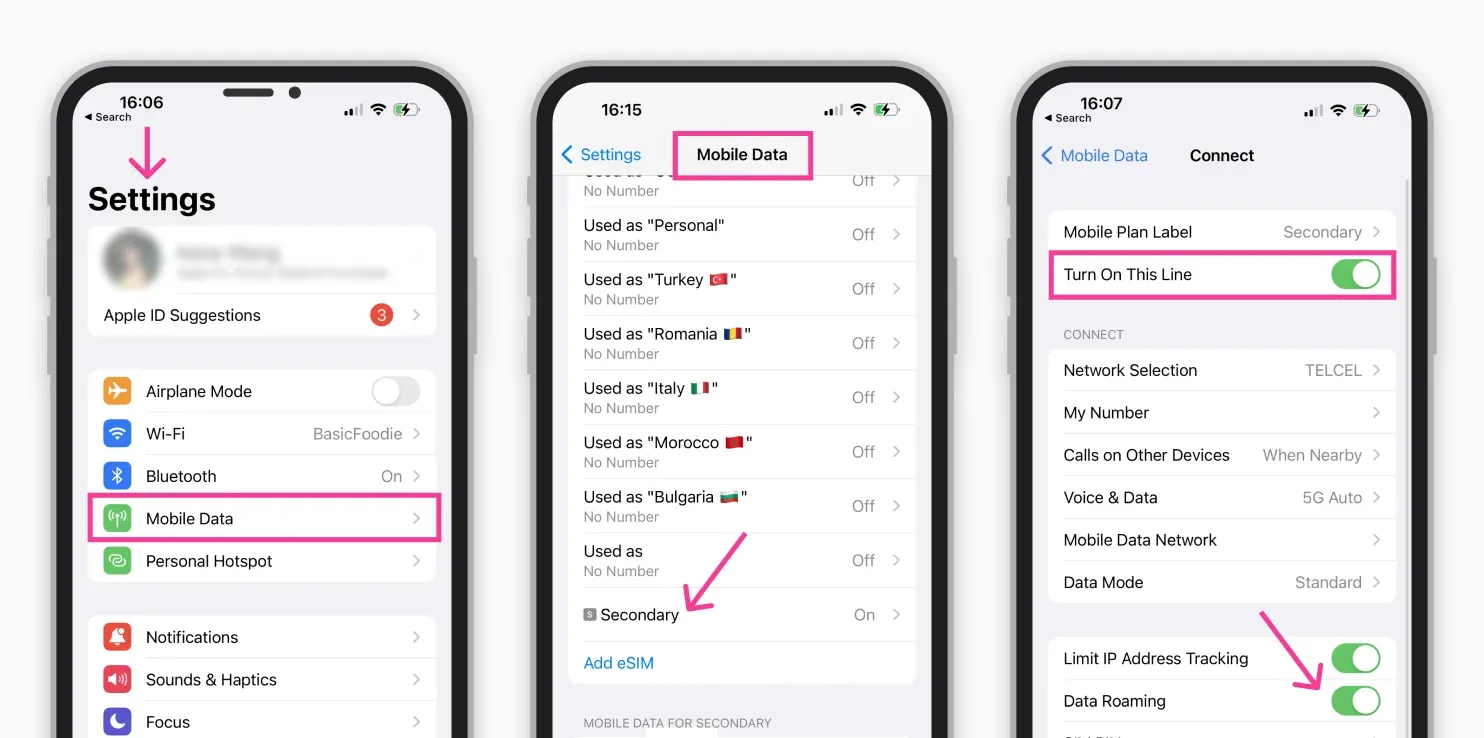
- Open the "Settings" app on your iPhone.
- Tap on "Mobile Data" depending on your device’s language settings.
- In the Mobile Data menu, look for a list of available eSIMs. An activated eSIM will appear here with a label like "Secondary"
- Tap on the plan name and make sure the toggle button is switched on, indicating the line is active.
- Turn on Data Roaming to connect to the internet.
If you have set up multiple eSIMs, you’ll see each one listed separately here. Tap into each plan to see specifics like the carrier name and phone number, and use the toggle button to turn on or off each line. This will allow you to easily switch between and manage several eSIMs.
You can also rename your eSIM plans for easier identification instead of relying on generic names like "Secondary". Simply tap into the plan details and edit the plan name field.
How to Remove an eSIM from an iPhone
Here's how you can easily remove an eSIM from your iPhone if you wish to:
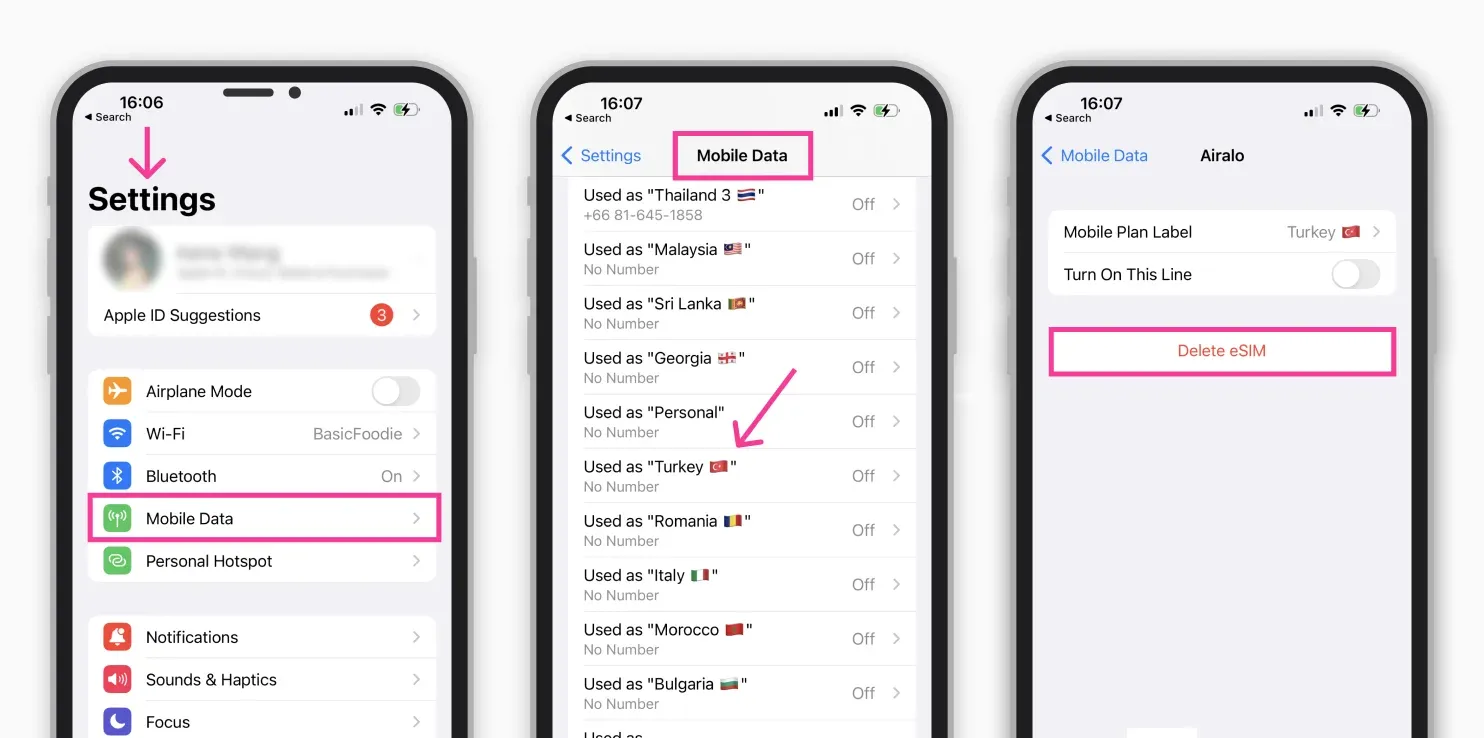
- Go to "Settings"
- Tap on "Mobile Data"
- Select the plan you want to erase.
- Tap "Delete eSIM"
How to Transfer an eSIM from One iPhone to Another
Got a new iPhone? No problem! Just follow these steps to transfer your eSIM:
- Update both iPhones to iOS 13.1+ for "QuickStart eSIM transfer"
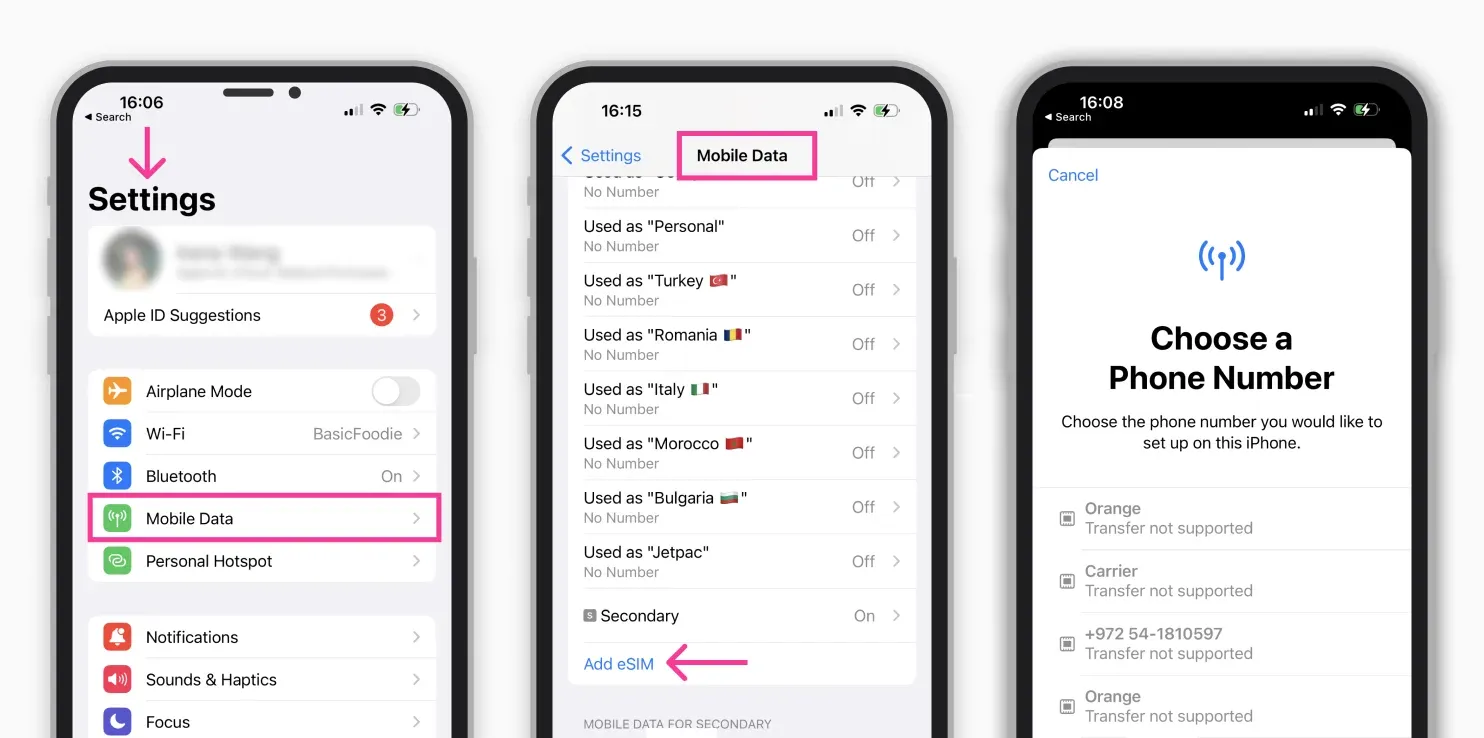
- On the new iPhone, go to "Settings" > "Mobile Data" > "Add eSIM". If your eSIM plan is listed, add it
- Try scanning the original QR code from your eSIM carrier
- Alternatively, use your carrier’s iPhone app to install the eSIM plan
- Contact your carrier for a new QR code if needed. Provide your new iPhone’s Digital IMEI number and connect to WiFi for scanning the QR code
Are There Any Disadvantages to Using an eSIM on an iPhone?
For digital nomads and frequent travelers like us, eSIMs are truly a game-changing technology. But they aren’t perfect.
Here are the cons of using an eSIM on iPhone:
- Older iPhones models don't support eSIMs
- As a software-based solution, eSIMs potentially face higher risks of hacking and data breaches
- Transferring an eSIM to a new phone is more complex than swapping physical SIMs
- eSIMs are generally more expensive than physical SIMs
- Most eSIM providers cannot fix connectivity issues
This last point is why we ultimately chose GigSky eSIMs for our nomadic travels. As a full MVNO (mobile virtual network operator), GigSky can move around the networks we roam on. So, each time you will report connectivity issues to their customer service, they will shift you to a functioning network. And this is something most other eSIM providers can't really do.
What Happens to the eSIMs When You Reset an iPhone?
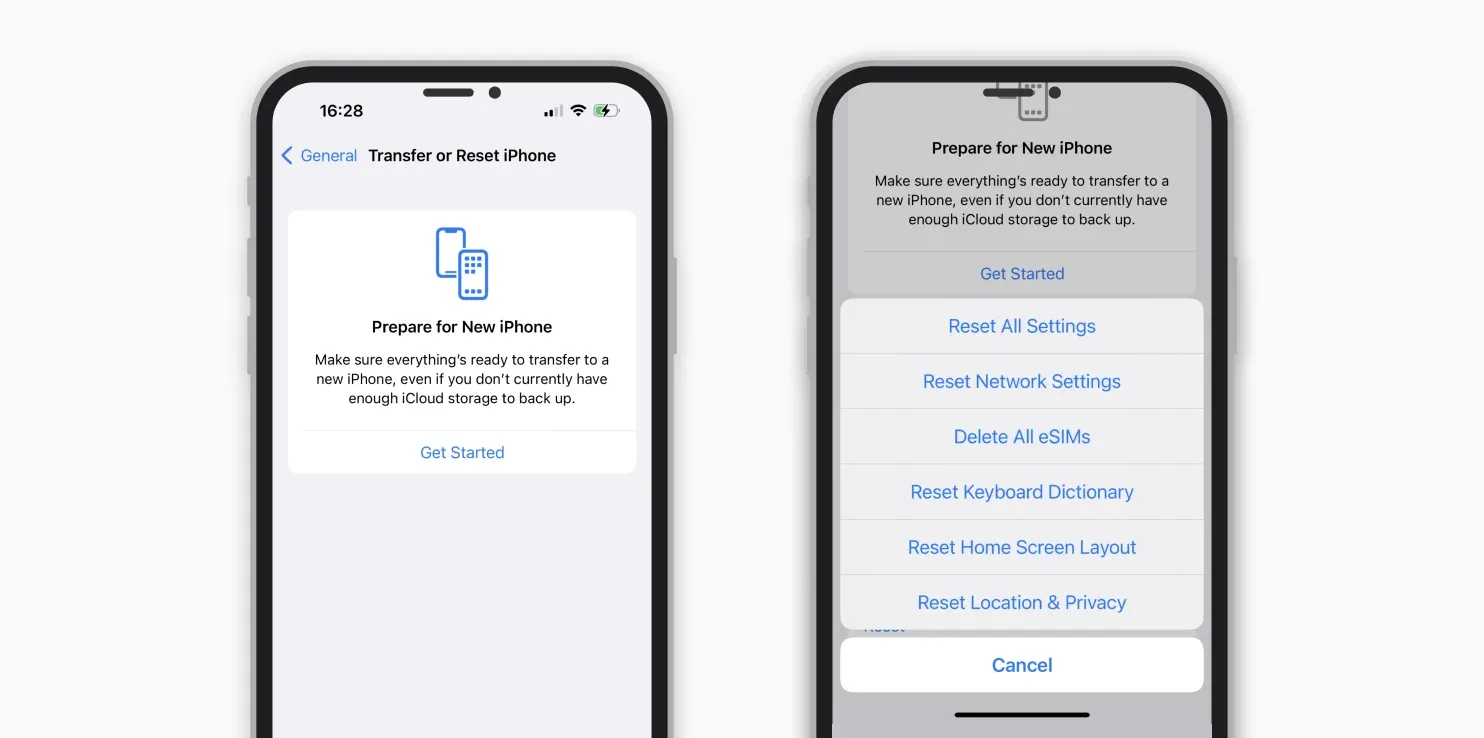
We know from personal experience that accidentally erasing your eSIMs after an iPhone reset is more common than not. But don't panic, we have the solution!
Generally speaking, during the reset process, you'll be asked whether to erase or keep your 'eSIM' or 'Mobile Plan'. Choose wisely: an erased eSIM means contacting your carrier for a replacement.
We happened to have wiped our eSIM plan rushing through reset after a long flight. Luckily Gigsky's stellar customer service swiftly got us back online with a simple QR code scan.
Moral is don't stress if your eSIM gets erased. Your provider can rescue you (we strongly vouch for GigSky's support!). But a little care upfront saves hassle for travelers like us relying on eSIM access.
Will My eSIM Transfer to My New iPhone?
In our experience transferring your plan to a shiny new iPhone isn't too terrible.
If both devices have iOS 16+, Quick Transfer should automatically bring your eSIM along during setup. We love when Apple makes life easy!
If that doesn't pop up, your carrier can simply text over a fresh QR code to scan into the new phone. A quick zap, and you're back in business!
Now some QR codes do expire after one use - annoying, we know. But fear not! Simply call your provider to get your eSIM migrated with a replacement code.
All in all, with a couple quick steps (or call if needed), keeping your beloved eSIM on a new iPhone is no sweat. Just be sure to check compatibility for buttery smooth transfers every time!
Troubleshooting Common Issues
If you're encountering issues with your eSIM, not to worry. Based on our own trial and error process, here are practical tips to help you navigate any difficulties:
- Check Device Compatibility: Ensure your device's hardware and software are compatible for eSIM activation. For iPhones, check that the device supports an eSIM profile and is running the latest version of iOS.
- Enter Correct Account Credentials: Make sure to enter accurate account details from your carrier. Incorrect information can prevent eSIM activation.
- Find Good Wi-Fi Connection: Avoid attempting activation in areas with poor service. Make sure you have a strong cellular or Wi-Fi signal before starting the activation process.
- Check if you have many eSIMs installed: We once couldn't find the issue to why we couldn't install our eSIMs. It turned out, it was because we forgot to delete our past eSIMs (and we had a ton!), so once we deleted a few of them, the eSIM worked perfectly!
- Reset Network Settings: If problems persist, try resetting the network settings on your device. Go to "Settings" > "General" > "Transfer" or "Reset (Device)" > "Reset" > "Reset Network Settings".
- Complete the Activation Process: Ensure the activation process is completed without prematurely closing the "Settings" app or turning off the device.
- Reboot your Device: In extreme cases, consider resetting the device to factory settings. This action will erase all data, so ensure you have a backup before proceeding.
- Contact Customer Support: If issues persist, contact your carrier’s support team for assistance, as they might need to provision the eSIM profile on their end or fix it.
Final Thoughts
So there you have it - everything you need to set up, activate, manage, and troubleshoot eSIMs right from your iPhone, just like we do during our digital nomad adventures!
At the end of the day, eSIMs unlock way MORE flexibility for globetrotting iPhone users. And you should totally treat yourself to that flexibility - whether splitting business and personal lines, reducing roaming hassles cross-border, or simply trying local data as you jetset to new destinations.
We hope walking through our own firsthand experiences eliminates any head scratching as you master this top travel tech. Just take it step-by-step and don't hesitate to contact your carrier's support teams if you run into problems!
Ready to Use Your eSIM for Your Next Trip?

Find places, workspaces, events and a community that gets you.
Get Freaking Nomads Pro
Written by
Irene Wang
Digital nomad and co-founder of Freaking Nomads. She shares raw, unfiltered stories and helps nomads find resources to thrive while traveling and working remotely.
Freaking Nomads is supported by you. Clicking through our links may earn us a small affiliate commission, and that's what allows us to keep producing free, helpful content. Learn more
Read Next


Taiwan to reward repeat visitors with up to US$250 in travel discounts

Best Global eSIM Subscriptions for Digital Nomads